Ive been playing with the RASP of late. Got hooked on it after ditching cable TV and Im now running Pi's around the house getting great internet TV FREE!. I was involved years ago with the hardware development. Picked it back up to give it a whirl. GEEK WARNING. Pi's are a hoot and very addictive. There is geekness involved.
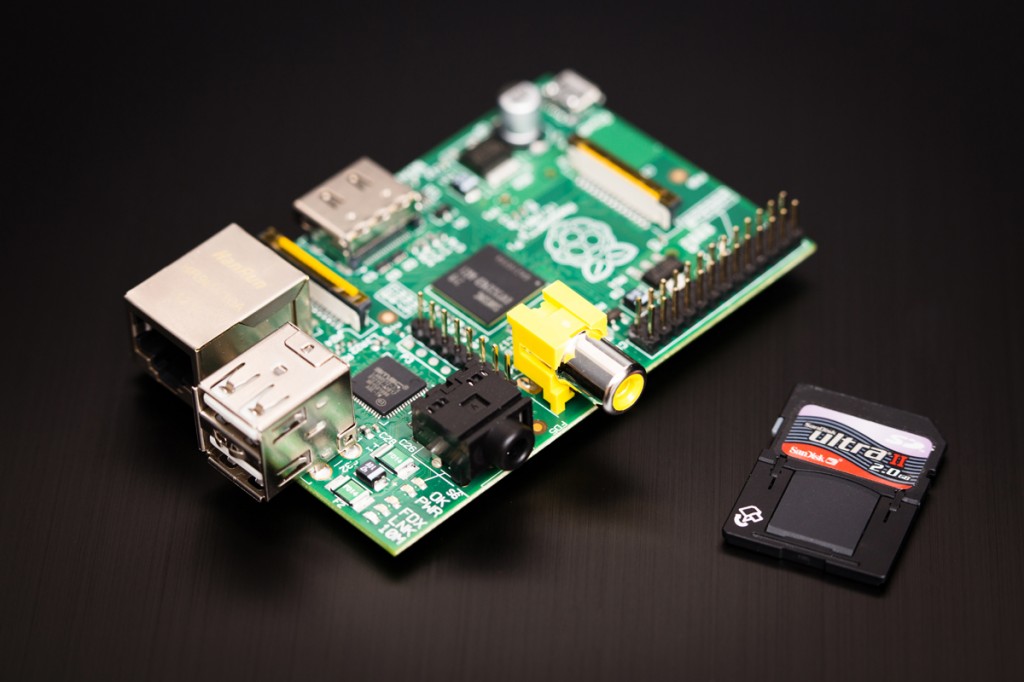
The Pi is a terrific platform. A very low cost little device. Here is what it looks like.
For ~ $65, you can have an iGate running connected to your scanner, or transceiver if you want to be a digipeater too. That's pretty good. So I decided to give her a try.
Here is what you will need from MCM who distributes these in the US. Other countries have other solutions for purchase.
item 83-14346 which includes the rev B Pi board, a 4gb SD card, power supply, and a case. Cost $59
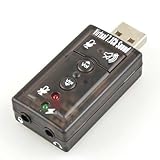
USB Sound Modem Card. I bought the item 83-15107. Its scratchy in recordings and Im going to try another one. I do not recommend you use this. Others have been successful and not successful in other countries with various models. So until I find a good working one, this is all not working.
I got this one and its not working well. Can't get reliable recordings. I also tried a FG-UAU01A-1AB-BC21 and it was absolutely useless.
Im going to give instructions here from a noob point of view under Windows. There are many ways to skin the cat. I am personally only interested in iGate functionality but others have digipeaters working just fine as well. Special thanks to my good friend Erik Schott from Hengelo Netherlands. He is way smarter and this aprs stuff than me.
Now onto the work.
With a 4gb SD card in hand, stick it in your computer. We have to get it partitioned and formatted. You need SD Card Formatter. Get it, install it. Run it.
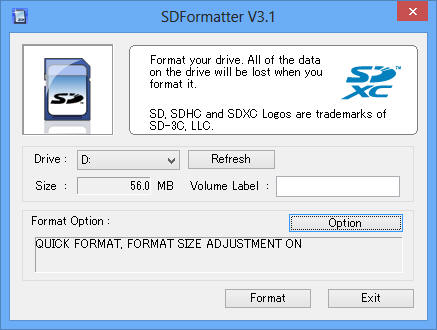
Click the option and select full overwrite and format adjustment size on. Click format. This will get your SD card ready to roll.

When you are done, it will look something like this.
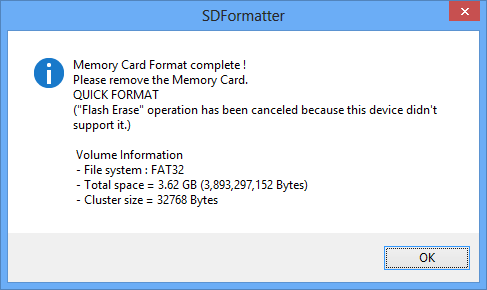
Yeah. Done.
Now we need to get the RASP Wheezy image. Go here. D/L it, store it somewhere where you can find it. Unzip it. Now you have the RASP image on your PC.
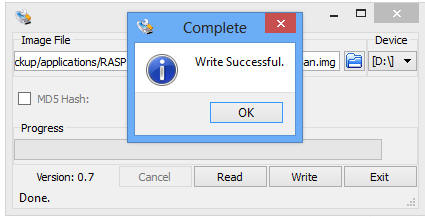
Lets get the image onto the SD card now. We need a tool to do that. D/L the Win32DiskImager.D/L. unzip, and install. Run it. Select your Wheezy img file, select your SD card drive, and click write. You now have an SD thats ready for the Pi.
Put the SD card in the Pi, put in the USB modem, plug in your network cable, and power that thing up.
Time to talk to it. I dont have a HDMI plug to a screen around, so I connect through WinSCP. Download the latest installation package, unzip, and install it. If you want to HDMI and USB keyboard, you can do that. But WinSCP is much easier as you will be able to cut and paste from here.
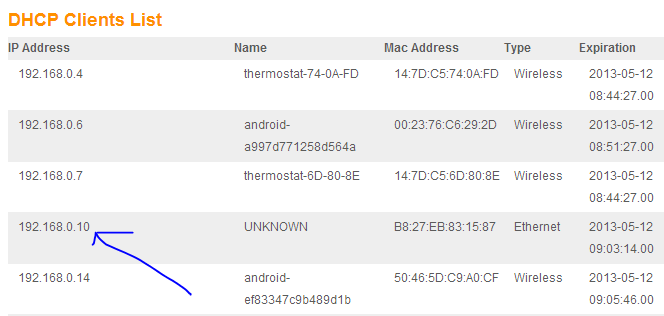
We now need to figure out what the IP address of the Pi is. Get your your router web interface, go to the LAN page, DHCP, and determine what the IP address is of your Pi. Your on your own for this. You will have to figure out which ip address. If your not sure, try them all with the steps below and figure out which one allows you to login with WinSCP credentials below.
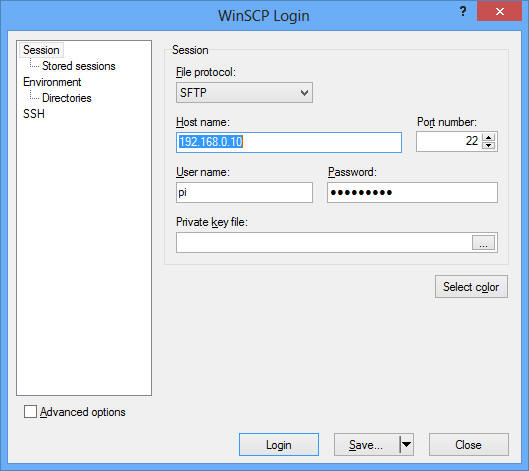
With your IP address, launch WINSCP, click new, select SFTP in file protocol, put in the Pi's IP address in the host, port 22, username is pi, password is raspberry. Select save, check the box to save the password, and click ok. You now have a stored login. Select the Pi login, click login, and off it goes.
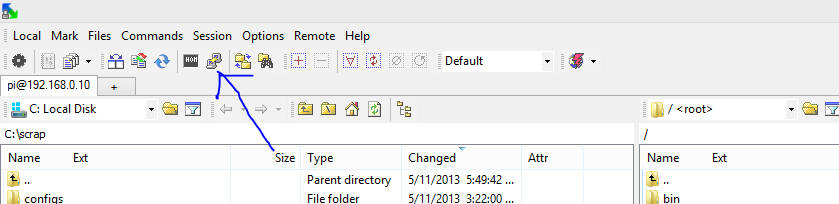
With any luck, your now seeing the Pi on the right, and your local machine on the left. Yeah. If not, your have done something wrong, You probably dont have the correct IP address.
Ok its time to open a putty session and see your Pi. Top of WinSCP is a little button to open a putty/ssh window. Click it.
A putty terminal session will open. It has already logged in as pi user, put in the raspberry password. Should look like this.
Update the RASP to the latest status with this command $ sudo apt-get update You can copy the command from here. Right click in the putty session and it will paste it in. This will take a few minutes.
Upgrade the RASP to the latest and greatest $ sudo apt-get upgrade This will take a while. After about 10 min it will prompt you. Say yes and let it roll. Perhaps 2 hours to finish. Just let it go. Come back later. Its done when the prompt comes back
Next is the ax25 sound modem and tools $ sudo apt-get install soundmodem ax25-tools ax25-apps libax25-dev screen You will get prompted. Just say yes. Takes a couple of minutes
Lets get the Pi users under control $ sudo su then $ passwd You can make the password what ever you want. I just put in raspberry to keep life simple for now.
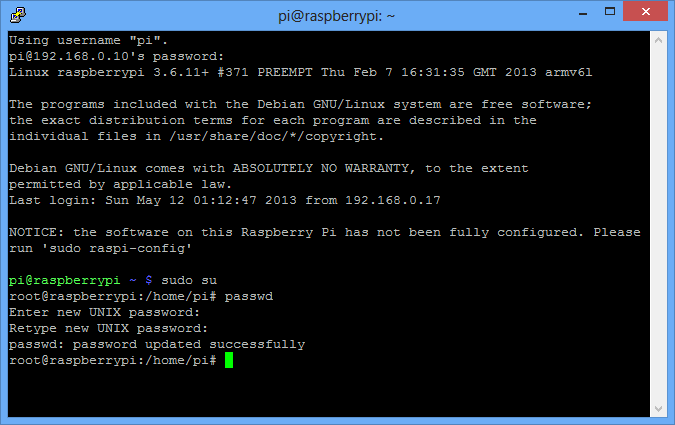
lets reboot the Pi $reboot Then I want you to close the Putty session. Close WinSCP, relaunch WinSCP, and create a new session same as above, except username is root. Login into the Pi with this root session, open putty window. put in your password raspberry, you will get a window. Use your arrow keys to just arrow down to finish. Hit enter key on finish.
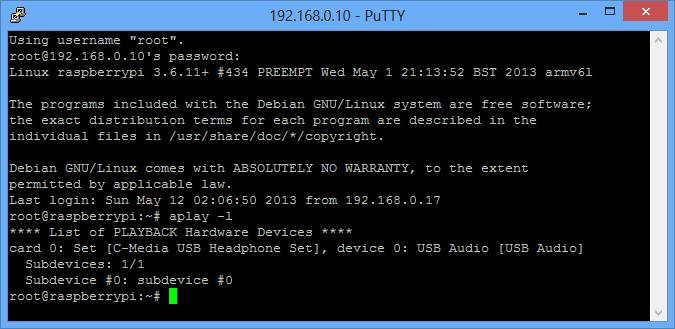
Lets see what the Pi thinks you have for USB $ lsusb This will display information about all USB buses in the system and all devices connected to them.
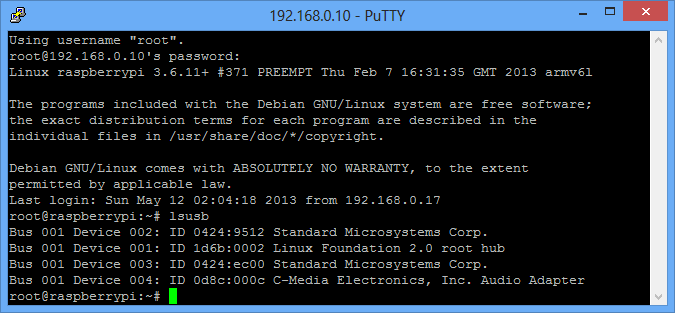
The C-media device is the soundcard. Thats our bogie. Yeah!
Wheezy come built in with Alsa Sound System pre-installed. ALSA, the Advanced Linux Sound Architecture (ALSA) , provides audio and MIDI functionality to the Linux operating system. Lets see what Alsa says $ aplay -l
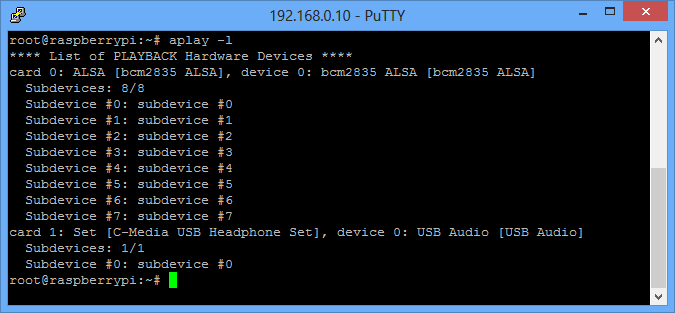
You can see the C-media USB device in there. Excellent. One problem, we need it listed first, or primary. Now we need to begin editing some files. There are a lot of ways to do this. I find I like to copy off the Pi to a local directory, edit it on my local drive and copy it back. Use WinSCP to move the files around. BE CAREFUL. Be careful moving, and be careful using your text editors, especially that damn Windows Notepad. Notepad and windows will reek havoc with you. Windows hides file name extensions, Notepad puts on .txt to everything. I use UltraEdit. But I paid for that fine editor and Im a programmer. You? If you are not a programmer, I recommend Programmers Notepad. A terrific cheap little program, free, and will keep you out of file extension hell. Use what ever you want. If your brave, you can just double click the file in WinSCP and edit it directly. First file to edit is below
/etc/modprobe.d/alsa-base.conf gives you the following
# autoloader aliases
install sound-slot-0 /sbin/modprobe snd-card-0
install sound-slot-1 /sbin/modprobe snd-card-1
install sound-slot-2 /sbin/modprobe snd-card-2
install sound-slot-3 /sbin/modprobe snd-card-3
install sound-slot-4 /sbin/modprobe snd-card-4
install sound-slot-5 /sbin/modprobe snd-card-5
install sound-slot-6 /sbin/modprobe snd-card-6
install sound-slot-7 /sbin/modprobe snd-card-7
# Cause optional modules to be loaded above generic modules
install snd /sbin/modprobe --ignore-install snd && { /sbin/modprobe --quiet
snd-ioctl32 ; /sbin/modprobe --quiet snd-seq ; $ ; }
install snd-rawmidi /sbin/modprobe --ignore-install snd-rawmidi && { /sbin/modprobe
--quiet snd-seq-midi ; $ ; }
install snd-emu10k1 /sbin/modprobe --ignore-install snd-emu10k1 && { /sbin/modprobe
--quiet snd-emu10k1-synth ; $ ; }
# Keep snd-pcsp from beeing loaded as first soundcard
options snd-pcsp index=-2
# Keep snd-usb-audio from beeing loaded as first soundcard
options snd-usb-audio index=-2
# Prevent abnormal drivers from grabbing index 0
options bt87x index=-2
options cx88_alsa index=-2
options snd-atiixp-modem index=-2
options snd-intel8x0m index=-2
options snd-via82xx-modem index=-2
Replace the items in green with
options snd slots=snd_bcm2835,snd_usb_audio
options snd_usb_audio index=0
options snd_bcm2835 index=2
And $reboot close your putty session, wait for your Pi to reboot, WinSCP will continue to reconnect until it does come back. Just wait for it. When WinSCP is back talking to the Pi, open the putty session again. Login. now lets see of we have the order right and a cleaned up config $ aplay -l
Time to play with the USB card. We are going to use alsamixer built into Wheezy. $ alsamixer
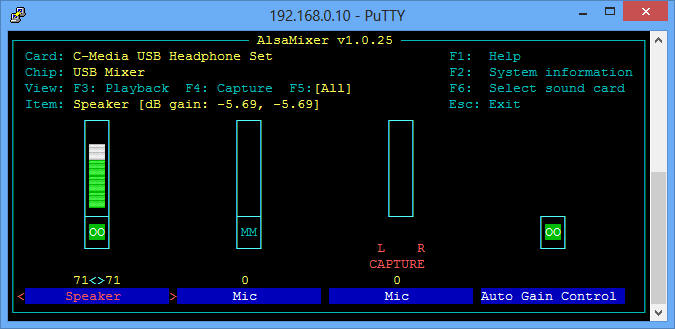
F5 to expand controls. arrow left and right around to select the item. Arrow up and down to change level. M mutes and unmutes. Plug in a set of headphones, plug in a mic, unmute and lets do a test. Esc out of the mixer and $speaker-test -c 2 You will hear it go back and forth. You can go back into the mixer and adjust the speaker volume. I found speaker at 71 to be just fine.
Need to edit the /etc/modules file. Starts with this.
# /etc/modules $ kernel modules to load at boot time.
#
# This file contains the names of kernel modules that should be loaded
# at boot time, one per line. Lines beginning with "#" are ignored.
# Parameters can be specified after the module name.
snd-bcm2835
We need to add snd-usb-audio to it so it looks like this. You can comment out snd-bcm2835 for the on-board device.
# /etc/modules $ kernel modules to load at boot time.
#
# This file contains the names of kernel modules that should be loaded
# at boot time, one per line. Lines beginning with "#" are ignored.
# Parameters can be specified after the module name.
#snd-bcm2835
snd-usb-audio
Next file to edit is /etc/asound.conf which you will have to create. Put this in it.
pcm.dmixer {
type dmix
ipc_key 1024
slave {
pcm "hw $0,0"
period_time 0
period_size 1024
buffer_size 8192
rate 48000
}
bindings {
0 0
1 1
}
}
pcm.asymed {
type asym
playback.pcm "dmixer"
capture.pcm "hw $0,0"
}
pcm.dsp0 {
type plug
slave.pcm "asymed"
}
pcm.!default {
type plug
slave.pcm "asymed"
}
pcm.default {
type plug
slave.pcm "asymed"
}
ctl.mixer0 {
type hw
card 0
}
Now reboot $reboot
Back to putty session, start alsamixer $alsamixer
Make sure the mic is unmuted. Get all the controls up to ~80 and lets do some recording. We are going to record a wav file and hear how it sounds. Esc out and $arecord -vv testsound.wav use (Ctrl-C to stop) your recording and to play it back $aplay testsound.wav Go back and forth in and out of the mixer until you have levels you like. I just pumped music out of my phones mp3 player and into the mic jack of the sound card.
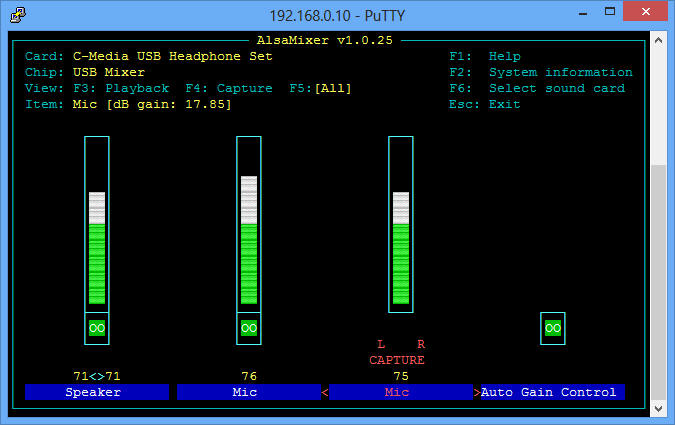
I found my recordings scratchy even with nothing plugged into the mic jack. Sample here. Still trying to work this out. With any luck, you are hearing your recording. If you dont have a microphone, you can plug in your radio and record some aprs traffic or what ever. Instructions further down on playing with a recorded aprs file you can download. Play with it until you get what you want.
Edit your /etc/ax25/soundmodem.conf and replace its contents with this. Put your callsign and SSID in the NOCALL and 00 spot. sm0 is the interface name, transmit delay (txd) is set at 250 for VOX operation and TX tail to 100.
<?xml version="1.0"?>
<modem>
<configuration name="AX25">
<chaccess txdelay="150" slottime="100" ppersist="40" fulldup="0" txtail="10"/>
<audio type="alsa" device="plughw $0,0" halfdup="1" capturechannelmode="Mono"/>
<ptt file="none" hamlib_model="" hamlib_params="" gpio="0"/>
<channel name="sm0"><mod mode="afsk" bps="1200" f0="1200" f1="2200" diffenc="1"
inlv="8" fec="1" tunelen="32" synclen="32"/><demod mode="afsk" bps="1200"
f0="1200" f1="2200" diffdec="1" inlv="8" fec="3" mintune="16" minsync="16"/><pkt
mode="MKISS" ifname="sm0" hwaddr="NOCALL-00" ip="44.94.11.8" netmask="255.255.255.0"
broadcast="44.94.11.255" file="/dev/soundmodem0"
unlink="1"/></channel></configuration>
</modem>
Need to change file permissions $ chmod 7555 /etc/ax25/soundmodem.conf
Edit the /etc/axports file so it has the sound module port sm0 in it. Replace NOCALL and SSID with yours.
# /etc/ax25/axports
#
# The format of this file is $
#
# name callsign speed paclen window description
#
#1 OH2BNS-1 1200 255 2 144.675 MHz (1200 bps)
#2 OH2BNS-9 38400 255 7 TNOS/Linux (38400 bps)
sm0 NOCALL-00 1200 255 2 VHF APRS (1200 bps)
Time to see if we can put it all together. $soundmodem This should give you this. Ctl C to quit.
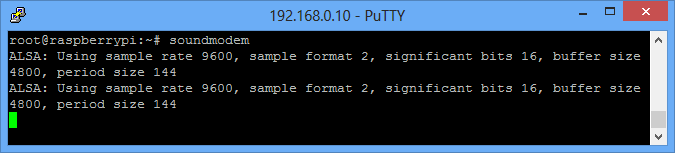
If you have the output above, well then its working. Yeah. We will output the soundmodem capture later on.
Lets see if we can transmit. First get the soundmodem going $soundmodem /etc/ax25/soundmodem.conf -R -M >/dev/null 2>/dev/null&
Then $/sbin/route add -net 44.94.11.0 netmask 255.255.255.0 dev sm0
Ping packets out every 10 seconds ctl-c to stop $/bin/ping -i 10 44.136.8.58
Connect packets go out on the audio $/usr/bin/axcall sm0 k7xyz via sea
And you should be hearing the infamous aprs fax machine noise in the headsets.
Kill the soundmodem $killall soundmodem
Now we need a small startup script to get the ax25 service up and running along with aprx. Create a file /etc/ax25/ax25-up.sh and put this contents in it.
#!/etc/ax25/
# Start ax25 with the soundmodem driver using the port sm0 and start aprx
# as defined in /etc/ax25/axports
# Raspberry PI with dixprs and soundmodem
# KJ4GPT
soundmodem /etc/ax25/soundmodem.conf -R -M >/dev/null 2>/dev/null&
sleep 5 && echo "sleeping 5"
/sbin/route add -net 44.94.11.0 netmask 255.255.255.0 dev sm0
echo "Soundmodem started at sm0"
sleep 1 && echo "sleeping 1"
# to start dixprs also automatically - uncomment the following line
# usr/local/dixprs -c /usr/local/config.txt
# do not forget to adapt the config file with your own data.
And we need to create an /etc/ax25-down.sh and put these contents in it.
#!/etc/ax25
# Stop ax25 with the soundmodem driver using the port sm0 and stop aprx
# as defined in /etc/ax25/axports
#Raspberry PI with dixprs and soundmodem
# PA0ESH -April 2013
killall soundmodem && echo "soundmodem killed"
killall aprx && echo "killed aprx"
# to stop dixprs also automatically - uncomment the following line
# killall screen
Now we need to make a few modifications so we can run it.
$su # (become root) (or for Ubuntu and LMDE use "sudo -s")
$chown root /etc/ax25/ax25-up.sh /etc/ax25/ax25-down.sh
$chmod 4755 /etc/ax25/ax25-up.sh /etc/ax25/ax25-down.sh
now we can start and stop the service with $sh /etc/ax25/ax25-up.sh or sh /etc/ax25/ax25-down.sh . Dont forget the up and down arrows in the terminal window scroll through previous commands. Useful.
Time to install APRX. You can get info on it here.
$ cd /tmp
$ wget http://ham.zmailer.org/oh2mqk/aprx/aprx-2.07.svn539.tar.gz
$ tar -xvzf aprx-2.07.svn539.tar.gz
$ cd aprx-2.07.svn539
$ ./configure
$ make clean && make && make install
Read the aprs manual and make your configuration changes to /etc/aprx.conf
You can try $ aprx -dvv and correct for any issues here
There are several ways you can test on your bench. I found this useful. First its nice to have sample aprs signals to test. Here is a wav file. Throw that on your favorite media player and pump it into the mic input jack. Then run $ sudo /usr/bin/axlisten -c -a # (listens for packets and displays then in the term window, Control-C to stop). I ran the .wav on my phone, put it in loop mode, and was able to troubleshoot. You can also run $ sudo /usr/bin/axcall aprs k7xyz via sea # (Connect packets go out on RF). Dont do either of these with APRX running otherwise you will gate this traffic if you happen to have it working. Ask me how I know. Run $killall aprx before dong this. Here are AX25 testing instructions should you need them. Here is a Packet-Radio TNC that uses a soundcard as a modem and supports AX.25 protocol at 300 and 1200 baud with dual port operation. The software Packet-Radio TNC uses the AGW Packet Engine API and emulates the AGW Packet Engine TCP interface in operation. It has been tested on Windows XP, Vista, 7, 8 and has proved stable in operation. This is useful for playing in windows to see how your receiver is doing compared with your RASPi.
I have created a zip of my config files used in these instructions. And a very special thanks to Erik Schott from Hengelo Netherlands for his development work. Enjoy