 |
2X rivet gun (a 3X is
required if you plan on riveting your own spars) |
|
hand rivet squeezer tool |
|
dimple dies (3/32, 1/8, #6,
#8) |
|
rivet sets for hand
squeezer (flush: 1/8" & 1/4", cupped: 3/32",
1/8", 3/16") |
|
rivet sets for gun
(1/8", 3/16", flush swivel , back-rivet set) I bought a
complete set including angle sets, but never used them. |
|
bucking bars (Avery #
615,675) |
|
Avery hand
riveting/dimpling tool |
|
back-riveting plate
(1/2" thick steel plate aprx. 6" x 10") |
|
fluting pliers and hand
seamer |
|
2 ea. 12" long drill
bits (#40 & #30) |
|
Unibit - step drill ( up to
7/8" diam. ) useful |
|
clecos - 150 ea. #40, 75
ea. #30, 10 ea. #10 |
|
cleco pliers (get 2 if you
are lucky and have a helpful friend) |
|
straight, left & right
offset snips |
|
micro-stop countersink cage |
|
stop countersink cutters
(#40, #30) |
|
circle cutter (up to
6" diam) |
|
speed deburring tool (if
you have a helper, get 2) |
|
files (1 fine, 1 coarse
with 1/2 round side, 1 rat-tail) |
|
polishing/deburring wheel |
|
Sanding station (belt
sander of some type) details below |
|
Air drill |
|
C-Frame dimpler (for
dimpling skins) details below |
|
Now, this looks complicated. And it is. (sorry , just being honest) Get with
another builder and borrow, lie, cheat, steal if you have to, but try not to acquire
all these for your private ownership because you will likely NEVER use these
again. And this stuff is not cheap. Like any hobby, just stick the word aviation
in front of anything and quadruple the price. I was fortunate to hook up
with a local EAA chapter and found a great guy who leant me many of his tools
for the next 6 years (thanks Charlie!!!)
With that being said, lets go into some other tools that are not required but
are "nice to have", then, if your like me, become required as time goes on.
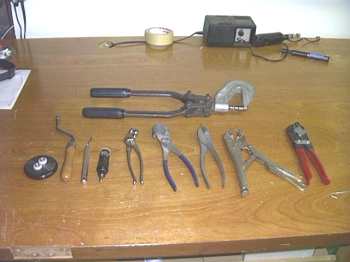
Here is a picture of some of the hand
tools
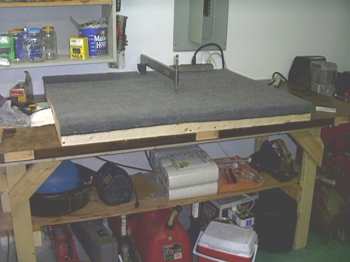
C-Frame Dimpler
The C-Frame dimpler below is used to
create dimples in sheet metal for counter sink rivets. The metal frame you see
sticking out is the dimpler. Around it is a 4'x3' bench top gismo used to keep
your material at the level of the dimpler. My dimpler is from Cleveland tools and came
with plans for the wooden frame, carpet top, bench top unit you see below. It took 20 min. to
build and is the best gismo I have to date. Makes dimpling much easier and your
holes are consistent every time. (Also if you plan on
building your own wing spars, as I did, you can use this tool as well. See the wing
spar section for details). You slide the sheet metal under the
frame, align your hole with the dimple die, and hit the top with a hammer and
bango, you have a perfect dimple in your sheet metal. I gave you a picture of
the underside below and right. It is a 3/4" x 3 1/4 " frame with a 3/8
plywood top. Why a 3/4" wide wooden frame? Well because you can't buy lumber
in that width of course!!! I ripped a 2x4 in my handy band saw and got the width
required in the plans. After building it I found a 2x4 frame would
have worked just
fine, but would be a bit heavier. DO NOT follow the plans from Cleveland. They are
wrong!!! Notice the 2 cross members between the c-frame on the picture showing
the underneath view? The plans say 6"
spacing, but the c-frame is 4" wide. This allows for 1" movement from
side to side of the c-frame. When you hit the shaft with the hammer, it moves around
causing you misery. Use a 4" spacing of the cross members and your c-frame
will not move around on you.
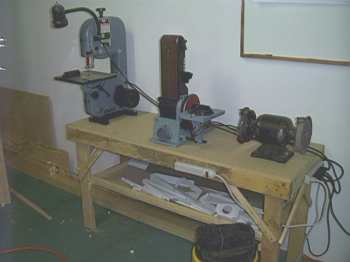
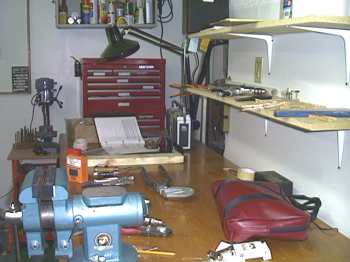
Work Station
I have found that having close quarters for tools is very advantageous. It
keeps me from running around the garage doing stuff. Things are close, easy to
get to etc. Below is my "workstation" with band saw, sanding station
and bench grinder. I am using this constantly. Plus it is another place to lay
things on. You cant have enough places to throw things on.
My main work area, a solid core door as a bench top, shelves above and below,
moving light for detailed work, radio, and my rolling tool chest and drill press
is where I spend 90% of my time. I cant emphasize enough, keep stuff close by.
Remember I am doing this in 1/2 of a 2 car garage.
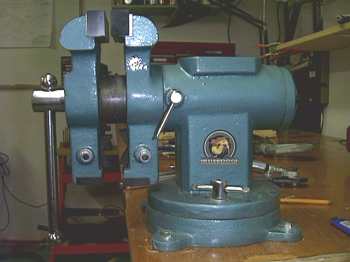
I think my best store bought, "best buy" item was this vise below.
Bought from Sam's Club for 50$. 30$ cheaper than anything comparable at Home
Depot and more features. It swivels horizontally and vertically. Has a flat
banging area, plastic inserts for the teeth grip area, a pipe grabber, and a 90deg.
bending thingy that I have used several times all ready to bend aluminum to 90deg.
angles. Not to mention this is very heavy duty. I have beet things silly in this
vise with no adverse affects. It has a "bulldog" label on the side.
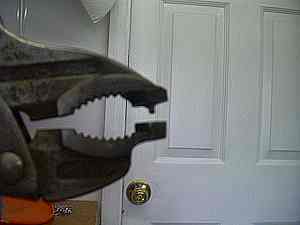
Here is a handy tool. I use this all the time. A pair of vice grips with
dimple dies welded to them. Handy for areas like spars, ribs, and skins. W/o
this, your stuck with the huge "yoke" ones that are heavy and bulky.
(thanks Charlie for lending me this gismo!!)
Last updated Tuesday, November 05, 2002